STEP IT UP
A look at how you can take a simple design and add techniques and product to ....well step it up :)CARD #1
This card is perfect for a new crafter or when you need to put a quick card together. Very simple in supplies (paper, ink and stamps) and skill level (stamping & glueing).
INSTRUCTIONS
1. Cut your Very Vanilla card stock to measure 5.5" x 8.5. Score it at 4.25".
2. Stamp the large sentiment in Emerald Envy ink on the front of the Very Vanilla card base. Use the Stamp-a-ma-jig to stamp the same sentiment in Dapper Denim (see video below). To keep this even easier just use one ink and stamp once.
3. Stamp the smaller sentiment in Dapper Denim ink.
4. Cut a piece of Moroccan Designer Series Paper (0.75" x 5.5") and adhere to the bottom of the card.
SUPPLIES USED
CARD #2
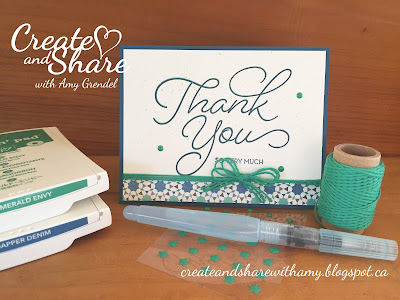
Taking it one step further - I've added some embellishments.
INSTRUCTIONS
(following the first 4 steps from card #1)
5. Wrap the Emerald Envy twine around the front of the card and tie a bow.
6. Add the Emerald Envy enamel dots
ADDITIONAL SUPPLIES USED
CARD #3
Building on the second card, but this time adding some layers and more techniques. This card is a perfect example of the:
MONTHLY CHALLENGE
ADDING COLOURING
I would love to see how you add a touch of colouring to your projects - cards, scrapbook layouts, pocket page cards - using either watercolour pencils, blender pens, aqua painters, Stampin' Write markers, brayers, daubers, sponges, spritzer, whatever....really the possibilities are endless!
To enter this months challenge, to be entered to win the monthly giveaway,
you can add a picture to the Create & Share Facebook Group
INSTRUCTIONS
1. Cut a piece of Dapper Denim card stock to measure 5.5" x 8.5. Score it at 4.25" to make your card base. Cut a piece of Very Vanilla card stock to 4" x 5.25"
2. Stamp the large sentiment in Emerald Envy ink on the front of the Very Vanilla card base.
Use the Stamp-a-ma-jig to stamp the same sentiment in Dapper Denim (see video below).
3. Stamp the smaller sentiment in Dapper Denim ink.
4. Add some Emerald Envy ink to a clear block and using the Aqua Painter brush add drops of colour to the Very Vanilla card front.
5. Cut a piece of Moroccan Designer Series Paper (0.75" x 5.25") and adhere to the bottom of the Very Vanilla card front.
6. Wrap three pieces of Emerald Envy twine around the front of the card and tie in a bow.
7. Add the Emerald Envy enamel dots.
8. Add Stampin' Dimensionals to the back of the Very Vanilla card front and adhere to the front of the card base.
ADDITONAL SUPPLIES NEEDED
STAMP-A-MA-JIG & WATERCOLOUR BACKGROUND
With each of the cards I used my new (so excited) Stamp-A-Ma-Jig - to create a pop with the Thank You stamp from the Sale-A-Bration, So Very Much, stamp set.
And for the background effect in Card #3 I used some ink and the Aqua Painter brush - here is a video showing both of these techniques closer:
So thats it for the February Step It Up feature - what did you think? Would you like to see more of these? I would love to hear from you - and don't forget every time you participate in the discussion both here and on FB you are entered into the Monthly Giveaway!
FEBRUARY UPDATES |
Its hard to believe we are over half way through February, but so far two of my February classes have come and gone and all were A LOT of fun!Sending Love Card Class
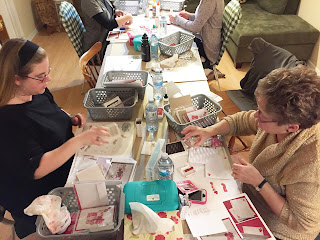
Last Friday night I had 6 ladies join me for my Sending Love card class - we made 4 full size cards and 3 mini cards. While we created, laughed and enjoyed some yummy treats we also played a fun game - Pass the Gift - and one lucky lady went home with some free product and gift certificate!
We had some fun playing with my new Big Shot too!
Men's Only Valentin'e Class
Then on Sunday I had 5 guys sign up for my Men's Only class and they braved it through all the snow to come make a creative Twist & Pop card for their wives along with a cute package to include some sweet treats. I was beyond impressed with the guys - they were much quieter than the ladies from Friday night, but they were focused on creating :) I loved how each of the guys made their card unique - making it with their own - very special for their wives. Plus the ladies each received a gift certificate with their card and gift to use towards products or classes. Happy shopping ladies!
Here is the front of the card:
And because its a Twist & Pop card - its easier to show the inside with a quick video:
To make the card I used a template from my Silhouette Cutting Machine - which made the mechanism that does the twist and pop very easy. I tried looking online for a template, and there are a lot, but can be quite confusing and time consuming. Let me know if you would be interested in a class featuring this cute wow card.
The rest of the supplies used for this card are below.
February Open Studio
There is still time to sign up for my Open Studio night on February 24th. Once you register - you are welcome to arrive at any time between 6-9pm and use my Stampin' Up! tools, inks and selected stamp sets. Plus there will be a fun Make n' Take available. The cost is $15 or FREE with a qualifying order ($25 or more).
For other upcoming events please click here.
Have a great long weekend! Hubby and I have plans to go ice fishing (ok I don't fish, I take a book), spend time with family and celebrate the anniversary when we got our sweet Abby. On the very first Family Day (2008) we picked Abby up from her foster family & life has never been the same!
Supplies from Twist & Pop card:


The Valentine's Card was a WOW indeed - in fact, I'm pretty sure that's exactly what I said when I opened it! I would love a class on how to make this twist and pop style, for sure!
ReplyDeleteAlso, I ADORE how you took a beautiful card and built on it in your Step It Up article - I would love to see more of these in the upcoming months as it helps me to get inspiration and see how a few simple additions can take a card to that next step!
Thanks April for the letting me know that - I really enjoyed seeing how I could step it up each time. I loved the first card though just as much - the Stamp-A-Ma-Jig is so handy!
Delete