Tuesday, April 1, 2025

Easter Bunny Cards

I have been loving all the projects that I've been putting together using the Storybook Moments products. I knew from the time I saw all of them I wanted to get them, but once I did I wasn't sure where to start. I find the Timeless Plaid papers work perfectly with the cards and the Storybook Moments papers work great for layouts and fussy cutting. 

Here is a closer look at the ones I have recently created:


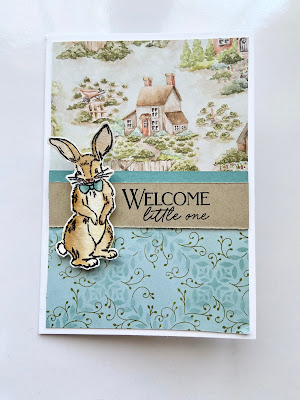
I like to have a few background stamps for cards like this - this one is from a retired set. It's something to keep your eye out for. The cute cottages are easy to cut out and would be great for welcome to the neighbourhood or congrats on a new home cards too.


Aren't these bunnies cute! I coloured using Pecan Pie, Lost Lagoon, Pumpkin Pie and Old Olive Stampin' Blends. I coloured the pearl embellishments using the Old Olive Stampin' Blends.


Isn't he cute. The bunny is cut out and popped up with dimensionals. The pot is coloured using Pecan Pie Stampin' Blends. Very simple card. 

Do give out Easter cards?
If you are interested in any of these products you can find them at my online store.


Monday, March 31, 2025

Harvest Time Scrapbook Layout

 Did you see my first layouts featuring the Storybook Moments suite?
It was all about setting up our small vegetable garden.

For my second layout I loved the chance to use some other products in the Storybook Moments.
These two pages were about our harvesting from our small garden.


For this layout I used the two-tone Lost Lagoon cardstock showcasing both sides in a subtle look with the contrast of more white cardstock. I decided not to add a title as it just didn't work. 


But I love the vegetables along the side with the bunnies - all fussy cut from the Storybook Moments designer series paper. Plus behind the three smaller photos I added Timeless Plaid designer series paper. 


Within the three gatherings of embellishments I stamped images from the Storybook Garden Patch stamp set and coloured using Stampin' Blends along with fussy cut pictures. 

If there is anything you would like to know more about please leave me a comment.


Thursday, March 27, 2025

Storybook Moments Cards


I created the card below using the Storybook Friends stamp set and a watercolour technique.


I love the soft look and feel of watercolour technique: 
  • I stamped the image using Stazon ink for the image and sentiment on Fluid 100 Watercolour Paper. I used Old Olive, Pecan Pie, Petal Pink and Lost Lagoon inks.
  • Before applying colour to the paper I add water to that area.
  • I add ink to a clear block and picked up with a wet brush.  
  • To add a darker shade I dry the area and go back in and add more ink. For lighter I add more water.

My number one tip is to practice, try different ways, watch videos of others, etc. 
If watercolour isn't something you want to try, instead use the Stampin' Blends or Stampin' Write Markers. There are many ways to colour the stamped images, they key is to find the one you enjoy and have fun!


To finish the card, I wrapped twine around the watercolour paper, tied it in a bow and using dimensionals mounted it on a Crumb Cake 5x3.5" and adhere to the front a White Notecard.

For my second card, I fussy cut out a watercoloured bunny and added to a layered White Notecard.
If you don't like to fussy cut, grab the coordinating dies. 


If you are interested in purchasing any of these products or others please visit my online store!

More projects coming next week!


Storybook Moments Scrapbooking


My son, Joshua, loves the story of Peter Rabbit, so when I saw the Storybook Moments suite of products I knew I had to bring them home. 

  • The Storybook Moments Suite - Step into a world of folk tales, garden pails, and fuzzy tails with the Storybook Moments! There are so many ideas for this suite from dressing up your springtime, Easter, or baby announcement cards by fussy cutting the neighbourly critters, gardening accessories, and countryside cottages or decorate scrapbook pages with the ornate frame patterns, flora, and hearty vegetables. 

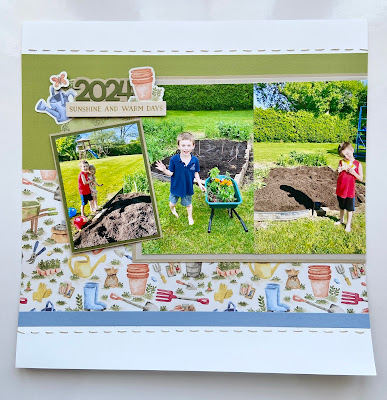
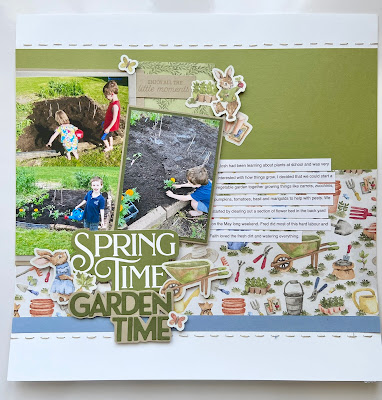
The first project I put together was a two page scrapbook layout - all about the start of our vegetable garden in 2024.


I used the following products: 

STORYBOOK MOMENTS SPECIALTY DESIGNER SERIES PAPER & STICKER SHEET


STORYBOOK LIFE 12" X 12" TWO-TONE CARDSTOCK


Along with 12x12 white cardstock and 8.5x11 Mossy Meadow and Crumb Cake cardstock.

I like to use sketches when planning out my layouts. I used this one from Allison Davis - I like the amount of photos, the layering and the stitching.


To add stitching I used embroidery floss that I had on hand (I also cross-stitch) but I could have used the Stampin' Up! twine or thread too. To add the holes I measured out with a ruler and pencil and used Take Your Pick tool with the double-ended pick tip to pierce the paper using the foam mat under the paper.


For my title and year I used a combination of stickers and dies included in the kit as well as I used a set of dies I have - though those in particular are no longer available there are a few available online and I believe a new set is coming out in the new catalogue. 


I would love to hear if you would like to create with this cute suite of products. 

Please feel free to shop online for any of these and if you need any help please let me know.

Stay tuned for more projects using the suites stamp sets and Timeless Plaid papers!


Monday, February 24, 2025

Crafting Made Easy!


Do you ever just want to craft but don't have the energy or time to design something? You just want to make something? Thats why I love Paper Pumpkin! Each month a surprise kit arrives and I get to play.

The January kit was perfect for doing just that! And more....


The kit came with everything to make three of each of these cards. 
So one thing I like to do is put together one of each of cards as directed. 
This helps me to get creative.... then I grab a few of my own supplies and see how I can create something of my own. 

I used a retired stamp set and the Classic Wedding stamp set.
I used the supplies that were in the kit to create:


I love how these all came together. 
I love to do this with Paper Pumpkin - you can easily coordinate with your own stash as all the colours are from the Stampin' Up! family. 


Paper Pumpkin also provide emails with suggestions on how you can change up the projects and make other things too. For example I found an old kit, also Valentine themed, and was able to play around with it too. 


I used a retired ice cream stamp set and the kits colours, to create this:


I made tags by trimming the card base in half:


Suggested Ideas Provided

And using the suggested ideas and included Snail stamp I came up with this:


There is so many options with the Paper Pumpkin kits.

You can sign up for a monthly subscription with the option to pause/skip or cancel anytime. Or can try for one, three, six or 12 months. 

There are so many options - and here is a hint as to what March's kit looks like:


Wednesday, June 29, 2022

CREATING WITH JOSH & ROBOT BUDDIES

Today, my almost 4 year old son, Joshua and I opened the Robot Buddies Card kit and had some fun creating a few cards.


We started with him picking out a design from the handout.

The stamp set is very easy for kids to use. The kit includes to ink spots and a clear block. Josh enjoyed picking the colour and stamp each time. The ink spot is small so he was able to ink up the stamp easily.


Since he doesn't have a lot of experience stamping, I had him stamp on some scrap papers and then fussy cut them out. He loves to use scissors and did a great job. This isn't a necessary step though.


I put the dimensional on the back of each stamped image, removed the back and then he decided where to put. He loved building the robot.


Once our first card was done he said he wanted to do another one - using the sticker sheet.
Again he loved being able to build the robots and choose which body and head to use.


He added more stamping around the stickers. The little gear stamps are perfect for this.


And voila - two amazing cards made by Joshua!


Oh wait - we forgot the goggly eyes! 


He loved this finishing touch to all the robots!


And his robot sticker card - he did everything!


and his stamped images - I helped with dimensionals and a bit of cutting - thats it.


This was so much fun and I know he will enjoy making more cards! I can add in other colours for inks or other products to - but the kit is perfect by itself. He already knows who he is giving these too. 

Want to have a kit on hand for you to do with your kids? 
There are a lot to choose from - visit my 24/7 online store for a full selection.

And the Kit sale ends tomorrow - so grab yours now!